Finding the Right Sewing Machine: A Guide for Beginners and Experts

Have you ever dreamed of turning ordinary fabrics into personalized masterpieces? Whether you’re looking to add custom designs to clothing, craft unique home decor, or even launch a small business, the right embroidery machine can open up a world of creative possibilities.
Choosing an embroidery machine, however, can be a complex decision. With a wide range of models and features available, it’s easy to feel overwhelmed. We understand that finding the perfect fit for your needs, whether you’re a beginner or an experienced crafter, is key to a rewarding creative journey.
In this comprehensive guide, we will walk you through everything you need to know. We’ll explore the different types of embroidery machines, highlight essential features to consider, and help you match a machine to your specific ambitions. We’ll also cover vital accessories and care tips to ensure your machine serves you well for years to come. For hands-on advice and a wide selection of machines, seeking guidance from knowledgeable retailers like Rocky Mountain Sewing & Embroidery can be incredibly helpful. Join us as we steer the exciting world of embroidery machines, helping you make an informed choice for your next creative adventure.
The world of embroidery machines is diverse, offering a spectrum of options custom to different needs and skill levels. Understanding these categories is the first step in identifying the perfect tool for your creative endeavors. From simple, single-needle models perfect for personalizing garments to sophisticated multi-needle powerhouses designed for commercial output, each type brings its own set of advantages.
Mechanical vs. Computerized Machines
At the heart of embroidery machine evolution lies the transition from mechanical to computerized systems. This distinction is crucial as it dictates the machine’s capabilities, ease of use, and potential for future expansion.
Mechanical machines, though less common in modern embroidery-focused contexts, rely on manual controls for stitch selection and pattern execution. They are typically simpler in design, offer a limited range of built-in stitches, and require more hands-on adjustment during the embroidery process. While durable and often more affordable, their lack of advanced features makes them rarely the choice for dedicated embroidery enthusiasts today.
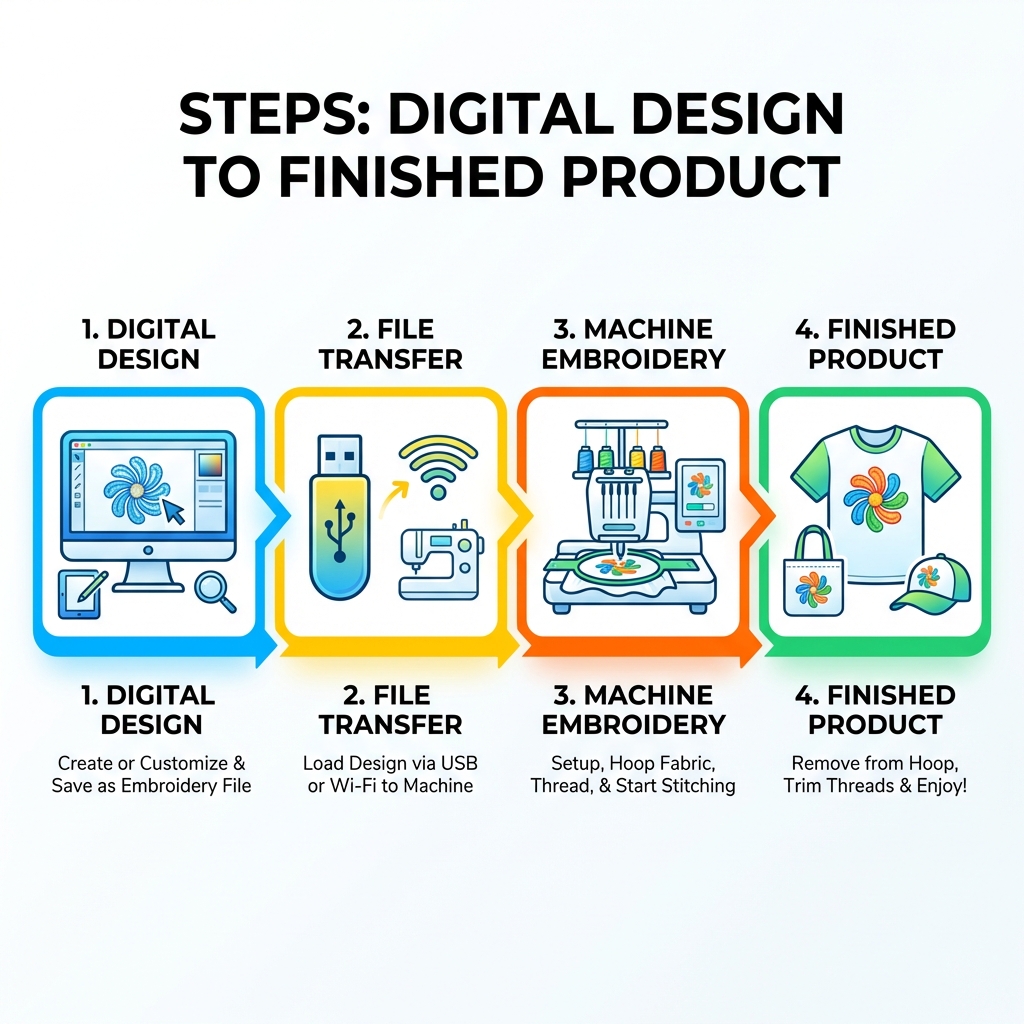
In stark contrast, computerized embroidery machines have revolutionized the craft. Most modern embroidery machines are computer-controlled and rely on digitized embroidery files to execute designs with precision and consistency. These machines come equipped with digital interfaces, often including LCD touchscreens, allowing for intuitive control over design selection, editing, and placement. A significant advantage of computerized models is their connectivity; they typically feature USB ports, and some even offer Wi-Fi capabilities, enabling users to easily upload custom designs and enjoy future machine updates. Brother computerized embroidery machines, for instance, are known for their broad array of patterns, designs, and fonts, offering immense creative flexibility.
It’s important to clarify the distinction between a “computerized” and a “programmable” embroidery machine, as these terms can sometimes be used interchangeably but have subtle differences. A programmable embroidery machine primarily automates the execution of pre-programmed designs. It allows users to control various functions with a button press and often offers computer connectivity for downloading or creating designs. However, a computerized embroidery machine goes a step further by integrating a more advanced operating system, offering extensive design customization, on-screen editing, and the ability to store a vast library of designs. These machines are designed to be more interactive and adaptable, allowing users to manipulate designs, combine elements, and even receive software updates. The first computerized embroidery machines were introduced to the home market in 1980, marking a significant milestone in making this intricate craft accessible to a wider audience.
Another fundamental choice is between a dedicated embroidery machine and a combination model that offers both sewing and embroidery.
Embroidery-only machines are built with a singular focus: to create intricate stitched designs. These machines often boast larger embroidery areas, faster stitching speeds, and more advanced embroidery-specific features. They are ideal for individuals or businesses whose primary goal is embroidery, without the need for traditional sewing capabilities. For example, the Janome MB-7 Seven-Needle Embroidery Machine, often recommended for home businesses, is an embroidery-only machine designed for efficiency and speed with multiple colors. The Alliance single-needle, free-arm machine, while single-needle, is also embroidery-focused, making it easy to work in tight quarters and on three-dimensional projects.
Combination sewing and embroidery machines, on the other hand, offer the best of both worlds. They allow you to switch between sewing garments, quilting projects, and home decor items, then embellish them with beautiful embroidery. This versatility makes them a popular choice for hobbyists and crafters who enjoy both aspects of textile arts. Many single-needle embroidery machines also serve as sewing machines, offering a space-saving, cost-effective solution. Machines like the Brother SE2000 or the Bernette B79 are prime examples, offering robust sewing functionalities alongside impressive embroidery capabilities. While combination machines are incredibly convenient, some models may have a slightly smaller embroidery area than dedicated embroidery-only machines or require more setup to switch between functions. However, for many users, the ability to perform both tasks on a single machine outweighs these minor trade-offs.
Essential Features to Look For in a Modern Machine
Once you’ve decided on the type of machine that best suits your needs, the next step is to dig into the specific features that will improve your embroidery experience. Modern embroidery machines come packed with innovations designed to make the creative process smoother, more efficient, and more enjoyable.
Workspace and Hoop Size
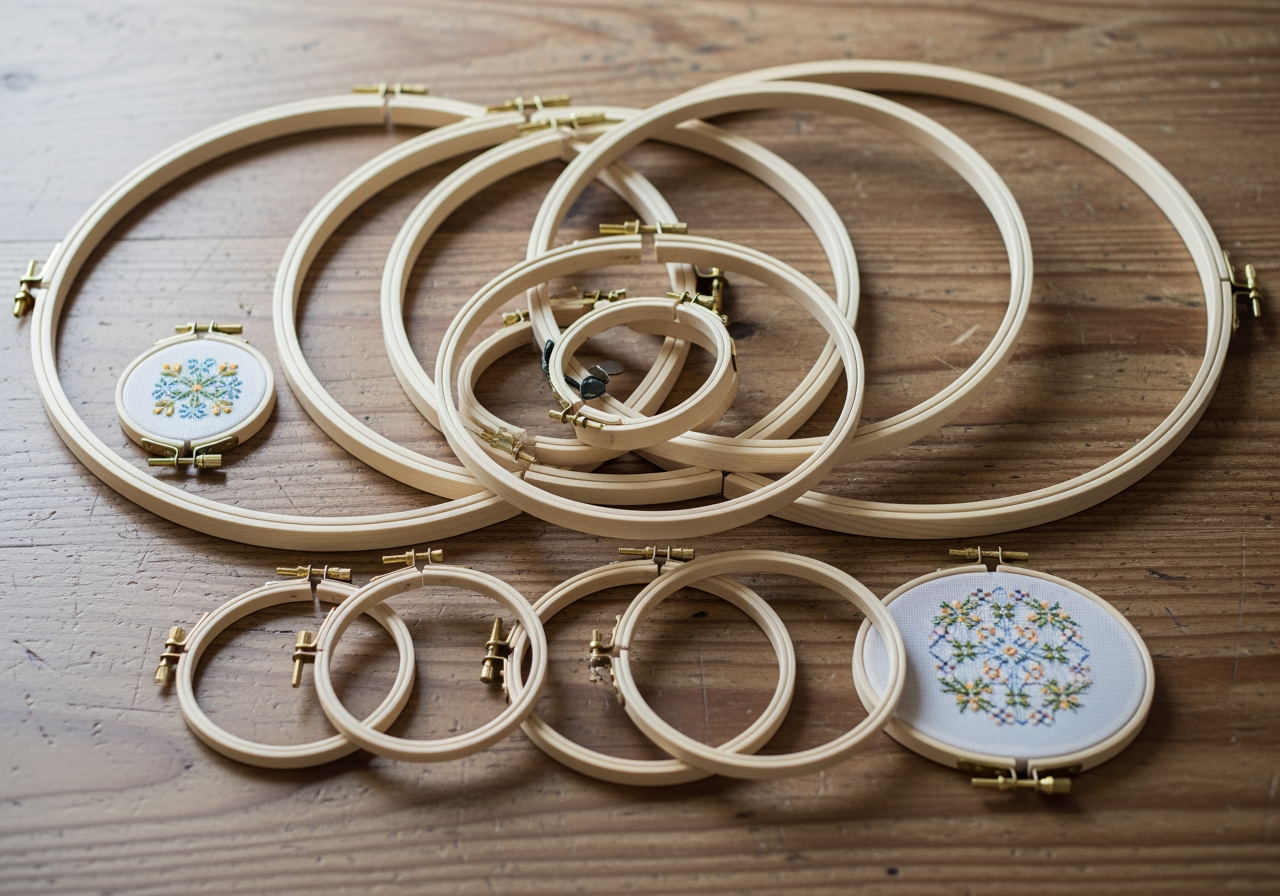
The size of your embroidery projects will largely dictate the optimal workspace and hoop size you need. The embroidery area refers to the maximum dimensions a machine can stitch in a single hooping. This is directly related to the hoop sizes that come with or are compatible with your machine.
For smaller projects like monograms on shirts, pocket embellishments, or small decorative motifs, a standard 4″ x 4″ hoop might suffice. However, if you envision larger designs, such as jacket backs, quilt blocks, or continuous borders, you’ll need a machine that supports larger hoops. Most machines have a hoop length of 4 to 10 inches, with some professional models offering even larger fields. For instance, the Alliance machine embroiders up to an 8” x 8” (200mm x 200mm) embroidery field, and comes with six embroidery hoops, including the largest 8” x 8”. The Baby Lock Altair 2 boasts a workspace accommodating hoops up to 9.5″ x 14″, while the Janome Memory Craft 14000 offers a massive 9″ x 11″ embroidery area.
Consider the throat space of the machine, especially if you plan to embroider bulky items like jackets or tote bags. A generous throat space allows for easier manipulation of fabric around the needle. Always match your machine’s hoop capabilities to the scale of your intended projects to avoid limitations down the line.
Connectivity and Design Options
The digital age has profoundly impacted embroidery, making connectivity and design flexibility paramount.
USB ports are a standard feature on most computerized embroidery machines, allowing you to easily transfer designs from your computer to your machine using a USB flash drive. This opens up a world of possibilities beyond the built-in designs, enabling you to purchase or create custom designs. Some advanced machines, like the Brother SE2000, even allow designs to be uploaded wirelessly, offering unparalleled convenience.
The TruViewTM LCD Color Touch Screen on machines like the Alliance, which measures 7” diagonally and shows 260,000 colors, provides a vivid interface for on-screen editing, design placement using drag and drop, and even displays estimated embroidery time and stitch count. This visual feedback is invaluable for precise design execution.
When it comes to designs, look for machines with a good selection of built-in embroidery designs and font options. The Alliance machine, for example, includes 125 built-in embroidery designs and 25 fonts, offering a solid foundation for creativity. However, the true power lies in the ability to import custom designs. Ensure the machine supports common file formats like PES, PEC, DST, and PHC, as these are widely used in the embroidery community. Many machines also come with, or are compatible with, design software that allows further customization, digitization, and the combination of different elements to create unique motifs. Computerized embroidery machines let you enjoy future machine updates and download embroidery designs to your machine, keeping your creative toolkit current.
Matching a Machine to Your Ambitions
Choosing an embroidery machine isn’t just about features; it’s about aligning the machine’s capabilities with your personal aspirations and skill level. Whether you’re taking your first stitch or looking to expand a burgeoning home business, there’s a machine designed to meet your specific needs.
How a Sewing Machine Retailer Can Help Beginners
For those new to machine embroidery, the array of options can be daunting. A beginner-friendly machine should prioritize ease of use, intuitive controls, and a supportive learning curve.
- User-friendly interface: Look for machines with clear, easy-to-steer LCD screens and straightforward button layouts.
- Built-in tutorials: Many modern machines include on-screen guides or instructional videos that walk you through basic operations like threading, bobbin winding, and hooping.
- Affordable models: Entry-level machines offer essential embroidery functions without overwhelming advanced features, making them a great starting point. The Brother PE535, for example, is often highlighted as a best option for beginners, praised by experts for its ease of setup, threading, and design selection, all at an affordable price point. It features a 4″ x 4″ embroidery field and comes with 80 built-in designs and 9 fonts.
A crucial resource for beginners is a specialized sewing machine retailer. These experts can provide hands-on guidance, demonstrate different machines, and help you understand how various features align with your project goals. They can also offer valuable insights into essential accessories and classes to get you started. For expert guidance and a wide selection of machines, we highly recommend visiting a reputable local store.
Leveling Up: Machines for Experts and Home Businesses
As your skills grow or your business ambitions expand, your embroidery machine needs will evolve. Experienced users and home businesses require machines that offer improved efficiency, durability, and advanced capabilities to handle higher volumes and more complex projects.
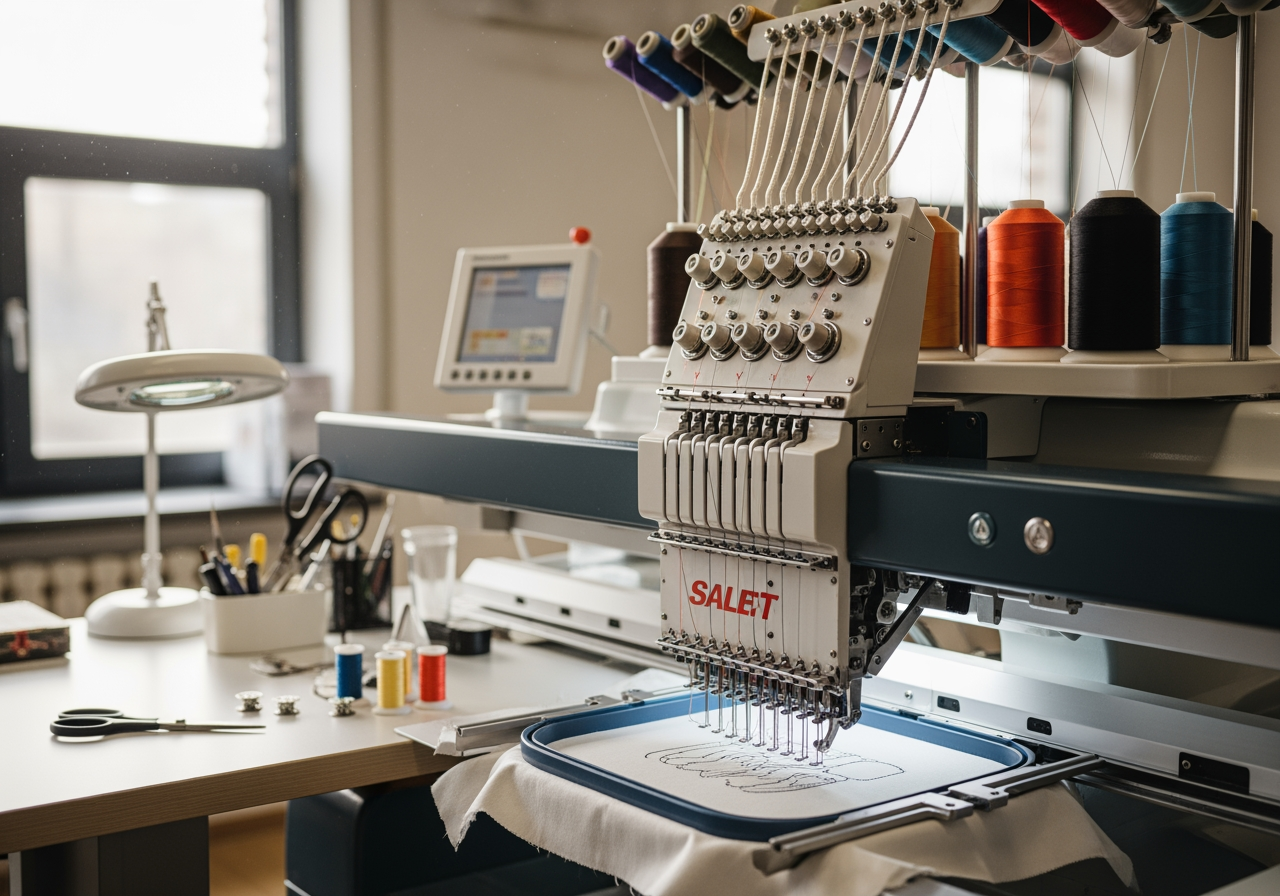
Multi-needle embroidery machines are a game-changer for home businesses, offering significant advantages in speed and productivity. Unlike single-needle machines that require manual thread changes for each color, multi-needle machines can hold multiple colors simultaneously, allowing for faster, uninterrupted embroidery. You can thread the seven needle heads in advance for quicker embroidery speeds with multiple colors, drastically reducing production time. The Janome MB-7 Seven-Needle Embroidery Machine is a prime example, often recommended for home businesses, featuring an independent bobbin winder that allows bobbin winding while the machine is embroidering.
For professional applications, features like faster stitch speeds (e.g., the Alliance machine boasts up to 1,000 stitches per minute) and larger embroidery fields become critical. These enable quicker completion of large designs and the ability to embroider on a wider variety of items, including bulky or pre-made garments. Durability and robust construction are also key, as these machines will be used more frequently and under more demanding conditions. Advanced features such as automatic thread trimming, advanced design editing software, and specialized hooping systems for challenging items like caps or sleeves further improve efficiency and creative control. If you’re capitalizing on current embroidery trends and selling your designs on platforms like Etsy, investing in a machine with these capabilities is well worth it.
Supplies and Care Tips from a Sewing Machine Retailer
Acquiring an embroidery machine is just the beginning. To ensure successful projects and the longevity of your investment, understanding the necessary supplies and proper maintenance is paramount.
Must-Have Accessories for Every Project
Embroidery is a craft that relies on a few key consumables and tools to achieve professional-looking results. Here’s a list of essential supplies you’ll need:
- Stabilizers: Crucial for supporting your fabric during embroidery, preventing puckering, and maintaining design integrity. They come in various types (cut-away, tear-away, wash-away, heat-away) suitable for different fabrics and stitch densities.
- Embroidery Thread: High-quality embroidery thread is designed for machine use, offering durability and a beautiful sheen. Polyester and rayon are common choices, available in a vast spectrum of colors.
- Bobbins: Pre-wound bobbins are a time-saver, or you can wind your own with bobbin thread, which is typically finer than top thread.
- Needles: Using the correct needle type and size for your fabric and thread is critical to prevent skipped stitches, thread breaks, and fabric damage. Universal, embroidery, and sharp needles are common.
- Small Scissors: Essential for snipping jump stitches and loose threads close to the fabric without damaging the embroidery.
- Hoops: While your machine comes with standard hoops, having a variety of sizes and specialty hoops (e.g., cap hoops, magnetic hoops) can expand your project possibilities.
Maintaining Your Machine for Longevity
Proper care and maintenance are vital to keeping your embroidery machine running smoothly and extending its lifespan.
- Regular Cleaning: Lint and thread dust can accumulate in the bobbin area and under the needle plate. Use a small brush and vacuum to remove debris after every few hours of use.
- Dusting: Keep your machine covered when not in use to prevent dust accumulation.
- Oiling: Consult your machine’s manual for specific oiling instructions. Some machines require regular oiling in designated spots, while others are self-lubricating.
- Needle Replacement: Needles dull quickly and can cause skipped stitches or fabric damage. Replace your needle after every 8-10 hours of embroidery or at the start of a new project.
- Professional Servicing: Just as a car benefits from periodic maintenance, your embroidery machine needs periodic professional servicing. A technician can clean, oil, and adjust components that aren’t accessible to the user, ensuring optimal performance. The Good Housekeeping Institute Textiles Lab, which has tested dozens of embroidery machines, emphasizes the importance of proper care.
- Tension Checks: Incorrect thread tension is a common culprit for poor stitch quality. Learn how to adjust both upper and bobbin tension according to your fabric and thread choices.
Frequently Asked Questions about Sewing and Embroidery Machines
Navigating embroidery machines often brings up a host of questions. Here, we address some of the most common queries to help clarify your decisions.
What are the pros and cons of a combination sewing and embroidery machine?
Pros:
- Space-Saving: Owning one machine that performs both functions saves valuable space in your craft room or home.
- Cost-Effective: Often, purchasing a combination machine is more economical than buying a separate sewing machine and an embroidery-only machine of comparable quality.
- Versatility: You can seamlessly transition between garment construction, quilting, and embellishing projects, making it a highly adaptable tool for diverse creative pursuits.
- Convenience: Many combination machines feature intuitive controls that make switching between sewing and embroidery modes relatively easy.
Cons:
- Switching Functions: While convenient, the process of converting the machine from sewing to embroidery mode (attaching the embroidery unit, changing the foot, etc.) can be a minor inconvenience for those who frequently switch between tasks.
- Smaller Embroidery Area: Some combination models may have a smaller maximum embroidery area compared to dedicated embroidery-only machines, which could limit large-scale projects.
- Potential Compromises: In some cases, a combination machine might excel at one function more than the other, or certain advanced features might be slightly less robust than on a specialized machine. However, many high-end combination machines offer exceptional performance in both areas.
What is the typical price range for these machines?
The price of embroidery machines varies significantly based on features, brand, type (single-needle vs. multi-needle, embroidery-only vs. combination), and included accessories.
- Entry-Level (Under $1,000): These are typically single-needle, computerized combination machines with smaller embroidery areas (e.g., 4″ x 4″) and a good selection of built-in designs. The Brother PE535 ($490) or Brother SE600 ($570) are excellent examples, offering great value for beginners.
- Mid-Range ($1,000 – $5,000): This category includes more advanced single-needle combination machines with larger embroidery fields (e.g., 5″ x 7″ or 6″ x 10″), more built-in designs and fonts, and improved connectivity options. The Brother SE2000 ($1,400) and Bernette B79 ($2,299) fall into this range, offering a balance of features and affordability for serious hobbyists. You might also find some entry-level multi-needle machines here, like the Brother PRS100 Persona Single-Needle Home Embroidery Machine (Sale price $5,499.00, Save $1,500.99 from its regular price).
- High-End/Professional ($5,000+): This segment is dominated by multi-needle machines, industrial-grade single-needle machines, and top-tier combination models with large embroidery areas, high stitch speeds, and a wide range of advanced features. The Janome MB-7 Seven-Needle Embroidery Machine ($4,999) and the Baby Lock Altair 2 ($9,499, originally $13,999) are examples of professional-grade machines designed for high-volume or intricate commercial work.
Factors influencing the cost include embroidery area size, number of needles, maximum stitch speed, screen quality and size, built-in designs and fonts, connectivity options (USB, Wi-Fi), automatic features (needle threader, thread cutter), and brand reputation.
What are some common troubleshooting tips for machine embroidery?
Even with the most advanced machines, occasional issues can arise. Here are some common problems and troubleshooting tips:
- Thread Breaking: Check Thread Quality: Use high-quality embroidery thread.
- Re-thread Machine: Ensure both upper and bobbin threads are correctly threaded.
- Change Needle: A dull or bent needle is a common cause.
- Adjust Tension: The upper thread tension may be too tight.
- Check for Burrs: Inspect the needle plate and bobbin case for rough spots that could snag thread.
- Needle Issues (Bending/Breaking): Use the Correct Needle: Ensure the needle type and size match your fabric and thread.
- Check Hooping: Fabric might be too tight or not taut enough in the hoop.
- Slow Down Speed: Reduce the machine’s embroidery speed, especially for dense designs.
- Puckering Fabric: Use a Proper Stabilizer: The stabilizer might be too light for the fabric or the design density.
- Hoop Correctly: Ensure the fabric and stabilizer are taut in the hoop without being stretched.
- Adjust Tension: Incorrect tension can contribute to puckering.
- Skipped Stitches:Change Needle: A new, sharp needle often resolves this.
- Re-thread Machine: Incorrect threading is a frequent cause.
- Check Bobbin: Ensure the bobbin is inserted correctly and wound evenly.
- Design Alignment Issues: Mark Fabric Accurately: Use precise marking techniques for design placement.
- Hoop Squarely: Ensure the fabric is hooped straight.
- Use Needle Beam/Positioning Features: Many machines include features such as a needle beam or camera for accurate design placement.
- Test Stitch: Run a test stitch on scrap fabric if alignment is critical.
Conclusion
Embroidery machines offer an incredible avenue for creative expression, changing textiles into personalized works of art. From the simplicity of a single-needle machine perfect for personal projects to the multi-needle efficiency demanded by a home business, there’s a machine out there for every ambition. We’ve explored the different types, the essential features that improve usability, and how to match a machine to your specific needs, whether you’re just starting or looking to expand your capabilities.
The right machine aligns with your creative vision, budget, and skill level. Don’t underestimate the importance of proper supplies and diligent maintenance to ensure your machine remains a reliable partner in your crafting journey. With this guide, you’re now equipped with the knowledge to make an informed decision and start on an exciting adventure in machine embroidery. Happy stitching!